wired

Beginning Wire and Metal
November 2014 – Suffolk Art Gallery
Suffolk, Virginia

GEDSC DIGITAL CAMERA

You never know what you are going to get when you have a room full of creative women and a pile of sheet metal and wire! In this class at the Suffolk Art Gallery these students rocked the house! Each had a different experience level and a different perspective, and each came up with exciting jewelry that matched their personalities!

We started with wire jump rings, clasps and ear wires, then moved on to the sheet metal: cutting, filing, sanding, shaping, then adding texture and color. A new addition to the class this time was the texture plate machine – usually used for scrapbooking and paper crafts – it adds amazing textures to sheet metal 26 gauge and thinner.

The class flew by and the students went home with lots of great new jewelry. Thanks a bunch guys, for a super fun day! And thanks to the Suffolk Art Gallery for having us!


new class schedule

Here are my new local class listings… I hope you will join me for some fun!

GEDSC DIGITAL CAMERAWire and Metal Jewelry Basics
Sunday, November 16, 2014, 1-4 pm
at the Suffolk Art Gallery

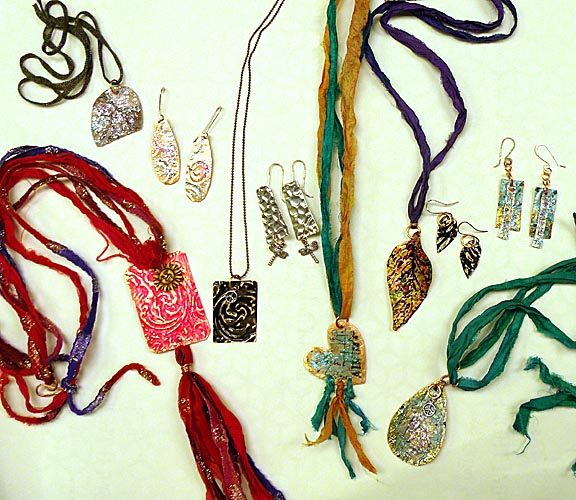
All Tools and Supplies Included. In this workshop, we will combine wire with metal sheet to make extraordinary fashion jewelry. Learn the basics of cutting, filing, hammering, stamping and shaping metal. Combine that with beginning wire techniques to form one-of-a-kind wearable art. Make your own ear wires, pendants, spirals, wraps and more for awesome earrings and necklaces. No soldering, no heat- all cold connections- the perfect class for folks who want to start on the right foot with metal and wire. Students should bring round nose pliers, flat nose pliers,tin snips and wire cutters. Optional: special charms or beads.
Suffolk Art Gallery is located at 118 Bosley Ave.
in Suffolk, Va. — 757-514-7284

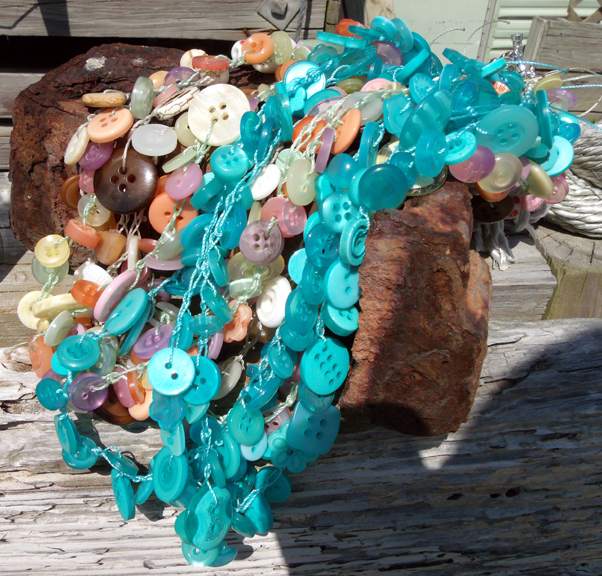
Button Stash Necklace
Sun., December 7, 2014, 1-4 pm
at Rawls Museum Arts
in Courtland, Va.

Bring your Grandma’s button collection and learn to make a beautiful crochet necklace. You will learn simple crochet and proper finishing techniques while using your own treasured buttons for a one-of-a-kind heirloom necklace.

Bring approximately 200 of your favorite buttons – all other supplies and tools will be provided. Your button collection can be multi-colored or a single hue – each will turn out beautifully.

Rawls Arts  is located at 22376 Linden Street in Courtland, Va. — 757-653-0754

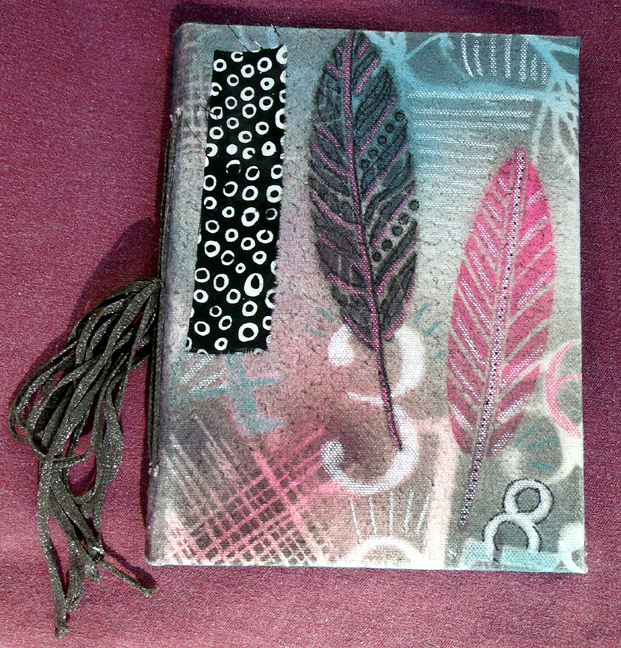
Street Style Graffiti JournalGEDSC DIGITAL CAMERA
Sunday, April 26, 2015, 1-4 pm
for the Suffolk Art League

Calling all Poets, Writers, Artists and Journalers! Looking for the perfect journal to hold your most creative thoughts? Each student will make a unique, bold and colorful 6” x 8” journal perfect for sketching, art journaling or writing. We will use heavy paper for pages, stencils and spray paint for street style images throughout, canvas for covers and fibers for texture.

Most supplies included. Students should bring basic tools including scissors, pencil and ruler. A bone folder or spoon will be helpful for folding pages. If you have stray spray paints (any color), please consider donating them to the class. If you are sensitive to paint fumes, bring a mask. We will be painting outside, rain or shine. Please wear old shoes

Suffolk Art League is located in the Suffolk Art Gallery at 118 Bosley Ave. in Suffolk, Va. — 757-925-0448

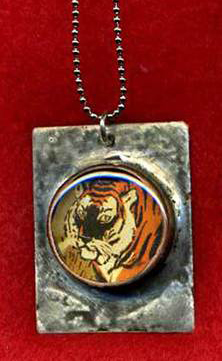
Beginner’s Torch Soldering: Beautiful Bezelsbezel
Sunday, May 3, 2015, 1-4 pm
at the Suffolk Art Gallery

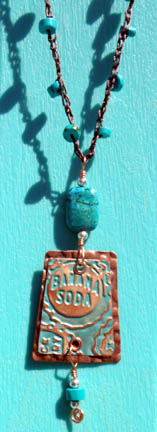
Learn the basics of torch soldering, cutting, filing and hammering copper to make beautiful round bezels that perfectly showcase your photos or artwork! Accessible materials and a simple process will make for sure-fire success! Fill them with resin to form a glass-like bubble for beautiful, personalized pendants to wear or give.

Students must bring: a butane torch, 1 full can of butane, tin snips, needle nose pliers, scissors, safety glasses, a cookie sheet and a fire brick or yard brick. Wearing safety glasses is mandatory.  Optional: small images about 1” in size. Photos or sized down versions of your artwork  work well.

Note: *All measures will be taken to create adequate ventilation as much as possible. If you have extreme sensitivities to soldering products or smelly stuff, consider this carefully before registering.

Suffolk Art Gallery is located at 118 Bosley Ave. in Suffolk, Va. — 757-514-7284

art & soul adventure

Art & Soul Retreat
Virginia Beach Resort Hotel, Virginia Beach, VA

me and the kaz

Susan K and me

Art and Soul is a creative retreat held each year in Portland, Kansas City, and luckily for us… Virginia Beach! The organizers bring in world-class instructors and schedule dozens of amazing classes for artists to choose from. This year I got to take 2 sold-out classes from Susan Lenart Kazmer, an internationally recognized mixed-media jewelry artist and teacher.

HOT VS COLD

I enjoyed both classes, and I especially enjoyed Susan’s teaching style,
her generosity and her energy.

The jury is still out… Hot Enameling vs. Cold Enameling

I can’t decide which class I enjoyed the most. While using the kiln or a propane torch to add a glass surface to metal was really fun and empowering, I also enjoyed using resin and various colorants on metal to form cold enameled pieces. Each has its own unique beauty and each has its benefits. The hot enameling dries to a hard, glass surface immediately when cooled while the cold enameling takes less equipment and can be done easily and inexpensively at home. Both methods create luscious layers of color, pattern and texture on metal.

My favorite part of both classes was using the torch to ball the ends of copper and brass wire to form a more beautiful wire wrap and a more professional looking finished piece of jewelry.

pinky jill san

Jill, Sandy, Pinky


More than anything else, Art and Soul is a place to meet like-minded folks, make new friends, connect with old friends and have fun. We make art and we learn from amazing teachers from all over the world. We get out of our comfort zones, stretch our creative selves and laugh until all hours of the night…

It’s a once-a-year
creative party!

See you next year
Art and Soul….

my current obsession…

Embroidered & Layered Scarf Tutorial

scarf

Obsession is a strong word…. but I do tend to go a little overboard when I get hooked on a project. This scarf began as a little side project between other projects that were on hold. I was dying to get back to some embroidery and I thought a scarf might be something to pass the time until I could get back to stitching my next pair of jeans. I need to keep my hands busy — this did the trick in a big way! It is a great way to use up some of those hand dyed fabric scraps too!

Materials
1 scarf sized piece of gauzy or silky background fabric – mine is 10″ x 5′ hand dyed cotton gauze

Assorted scraps of cloth – hand dyed sheers, silks, cottons, organzas and cotton prints – this is the perfect opportunity to dig into your scrap or recycle bin!

Assorted floss – cotton, silk, DMC embroidery thread and embroidery needle

Instructions

Decide on your finished scarf size. This one is about 10″ wide by 5 feet long but make it to suit your preference. Choose scraps in a combination of 3-4 colors.Trim your background fabric to size and start layering your scraps on top, overlapping pieces in an interesting composition. Tack down the layers on one side, then layer fabrics on the other side and tack them down as well. Use your sheer fabrics to their best advantage by layering them over prints and contrasting colors.

I added repetition by sewing on circles cut from store-bought printed fabrics. Repetition helps to give the piece a cohesive look and keeps it from looking like you just threw it together. I also repeated the same fabrics and thread colors throughout. This is important with this project, because it has such a bohemian, haphazard feel to it. Artsy is good, messy is not so good.

I did not put any batting or heavy fabrics in between the layers because I wanted it to have a soft, flowing, scrunchy feel to it. I wanted it to wrap easily around the neck without a lot of bulk. I also did not want to have to embroider through all those heavy layers.

When you have your fabric sandwich like you want it, pull out your needle and threads and start stitching. I left the knots exposed because i like the texture. I also like the random messy lines and rows and rows of running stitches. I did not do anything fancy — just put colorful stitches where i felt they would look good. On the circles, i started in the middle, radiating the stitching out to the outer rims.

The edges were finished with a blanket stitch. This really helped the piece look complete. I used red thread to give your eye a bold stopping point. Start to finish this piece took about a week to complete – mostly time spent in front of the TV. I have started on a creamy white scarf now and have added some photos of that into the gallery as well.  Hand wash, hang to dry. Holler if you have any questions… Sandy


This slideshow requires JavaScript.